Battery switch on travel trailer function is crucial for managing your RV’s power. Understanding how these switches work, from the simple disconnect to more complex systems, is key to safe and efficient power management. This guide will walk you through different types of battery switches, safe connection and disconnection procedures, troubleshooting common problems, and essential maintenance tips to keep your travel trailer’s electrical system humming along smoothly.
We’ll cover everything from identifying the various switch types and their pros and cons to understanding how they interact with other power systems like solar panels and inverters. We’ll also provide step-by-step instructions, safety precautions, and helpful troubleshooting advice, ensuring you’re confident in managing your RV’s power supply.
Battery Switch Types in Travel Trailers
Choosing the right battery switch for your travel trailer is crucial for managing your power sources efficiently and safely. Different switches offer varying levels of control and protection, each with its own advantages and disadvantages. Understanding these differences will help you select the best option for your needs.
Battery Switch Types and Functionality
Travel trailers typically utilize several types of battery switches, each designed for a specific purpose. Let’s examine the most common ones.
| Type | Function | Pros | Cons |
|---|---|---|---|
| 1-2-Both Switch | Allows selection of either the main house battery, the auxiliary battery (often used for starting), or both batteries combined. | Simple operation, provides flexibility in using either battery or both simultaneously. Good for basic setups. | Limited protection; doesn’t isolate batteries completely. Can lead to accidental draining of one battery if not used carefully. |
| Disconnect Switch | Completely isolates the batteries from the trailer’s electrical system. | Provides complete battery disconnect for safety and to prevent parasitic drain when the trailer is stored for extended periods. | Requires manual switching; inconvenient if you need to access the batteries frequently. |
| Combination Switch (with Battery Isolator) | Combines a battery disconnect switch with an automatic battery isolator. The isolator allows charging of both batteries while driving, while the disconnect switch provides complete isolation when needed. | Offers the best of both worlds: convenience of automatic charging and safety of complete disconnect. | More complex and generally more expensive than simpler switches. |
| Smart Battery Switch | These switches often incorporate features like automatic charging control, load sensing, and low-voltage protection. They often connect to a battery monitor system. | Provides advanced features for efficient battery management and monitoring, minimizing the risk of battery damage. | Generally the most expensive option; requires more technical understanding for setup and maintenance. |
Connecting and Disconnecting Batteries: Battery Switch On Travel Trailer Function

Working with your RV’s batteries requires careful attention to safety. Improper handling can lead to injury from sparks, acid burns, or even explosions. This section details the safe and correct procedures for connecting and disconnecting your batteries using a battery switch. Remember, always prioritize safety.Connecting and disconnecting your RV batteries involves a straightforward process if you follow the correct steps and safety precautions.
So, you’re getting ready for a road trip in your awesome travel trailer? First things first: make sure you understand your battery switch on travel trailer function – it’s key to keeping your lights and fridge running. Once you’ve got the power sorted, it’s time to think about entertainment. Setting up a killer audiophile travel aetup is totally doable, even in a small space; just pack some good headphones and a portable DAC for crystal-clear sound on the road.
Happy travels!
The type of battery switch you have (e.g., a single-pole, double-pole, or multi-bank switch) will slightly alter the process, but the core principles remain the same. This guide will assume a basic understanding of your RV’s electrical system and battery setup.
Battery Connection Procedure
Before you begin, ensure you have the correct tools: a wrench or socket that fits your battery terminals and eye protection. It’s also a good idea to wear gloves to protect your hands from potential acid spills or corrosion. Work in a well-ventilated area to avoid inhaling potentially harmful fumes. If possible, disconnect any other electrical devices before working with the batteries.
- Locate your battery switch. It’s usually easily accessible, often near your batteries themselves. Make sure the switch is in the “OFF” position.
- Inspect the battery terminals for corrosion. Clean them with a wire brush if necessary. Corrosion can impede a good connection and create resistance, leading to heat buildup and potential hazards.
- Connect the positive (+) cable first. Carefully attach the cable clamp to the positive terminal, ensuring a secure connection. Tighten the clamp firmly with your wrench, but avoid over-tightening.
- Next, connect the negative (-) cable to the negative terminal, following the same procedure as with the positive cable. Again, ensure a secure and snug connection.
- Once both cables are securely connected, turn the battery switch to the “ON” position. Check your RV’s electrical system to confirm power is restored to the connected battery bank.
Battery Disconnection Procedure
Disconnecting your batteries is just as crucial as connecting them safely. Follow these steps to ensure a safe and efficient disconnection.
- Turn your battery switch to the “OFF” position. This will cut power to the batteries, preventing accidental shocks or shorts.
- Disconnect the negative (-) cable first. Loosen the clamp and carefully remove the cable from the negative terminal.
- Next, disconnect the positive (+) cable from the positive terminal. Again, ensure you loosen the clamp carefully before removing the cable.
- After disconnecting both cables, inspect the terminals for any signs of damage or corrosion. Clean them if necessary to maintain optimal battery health. Remember to store your cables in a safe place to prevent accidental damage or connection.
Safety Precautions When Working with RV Batteries
Working with RV batteries involves several potential hazards, and safety should be your top priority. Always wear appropriate safety glasses or goggles to protect your eyes from splashes of battery acid. Proper ventilation is crucial to prevent the inhalation of harmful fumes released by the batteries. Acid burns are a serious risk, so wear gloves made of a material that provides protection against acids (nitrile or similar).
Never smoke near the batteries, as hydrogen gas released by the batteries can be highly flammable. If you encounter any problems or are unsure about any aspect of the process, consult a qualified RV technician.
Troubleshooting Battery Switch Issues
Dealing with a faulty battery switch in your travel trailer can be frustrating, leaving you without power when you need it most. Fortunately, most problems are relatively straightforward to diagnose and fix with some basic troubleshooting. This section will guide you through common issues and how to resolve them.
Common problems with travel trailer battery switches usually boil down to a lack of power or blown fuses. No power could stem from a variety of sources, including a bad switch, corroded connections, blown fuses in the switch itself or elsewhere in the circuit, or even a faulty battery. Blown fuses are a clear indicator of a short circuit somewhere in the system, requiring careful investigation to find the root cause.
Diagnosing Battery Switch Problems, Battery switch on travel trailer function
Systematic troubleshooting is key to identifying the source of the problem. Start by visually inspecting the switch itself and its connections. Look for loose wires, corrosion, or any signs of physical damage. A simple visual check often reveals the culprit. Next, check the fuses both in the switch and any other related fuse boxes.
So, you’re prepping for a road trip? Awesome! First things first: make sure you understand your travel trailer’s power. Check out this guide on the battery switch on travel trailer function to avoid any dead-battery surprises. Once you’ve got the power sorted, it’s time to think about entertainment. If you’re an audiophile, you’ll want to check out audiophile travel aetup options to make sure your tunes sound amazing on the open road.
Proper planning means a smoother, more enjoyable trip!
A blown fuse will be visibly broken or burnt. If a fuse is blown, replace it with a fuse of the same amperage rating. If the new fuse blows immediately, you have a short circuit somewhere in the wiring that needs attention. If the fuse doesn’t blow, the problem likely lies elsewhere in the system. Testing the battery voltage with a multimeter is also crucial to rule out a dead or weak battery as the problem.
A low voltage reading might indicate the battery needs charging or replacement.
Troubleshooting Flowchart
A visual flowchart can simplify the troubleshooting process. This flowchart Artikels the steps to diagnose a non-functioning battery switch:
Start → Visually Inspect Switch and Connections (Loose wires, corrosion, damage?) → YES (Repair or replace as needed) → Test Switch Functionality (Power restored?) → YES (Problem solved) → NO → Check Fuses (Blown fuses?) → YES (Replace fuse, if it blows again, investigate short circuit) → NO → Test Battery Voltage (Low voltage?) → YES (Charge or replace battery) → NO → Check Wiring for Breaks or Damage → Repair or Replace Wiring → Test Switch Functionality (Power restored?) → YES (Problem solved) → NO → Replace Battery Switch → End
Examples of Common Problems and Solutions
Let’s consider a couple of real-world scenarios. Imagine a situation where the battery switch is not turning on. After visual inspection, you find a corroded connection. Cleaning the connection with a wire brush and applying dielectric grease solves the problem. In another scenario, you have no power at the outlets, and you find a blown fuse.
Replacing the fuse restores power, but it blows again immediately. This points to a short circuit somewhere in the system, possibly caused by a damaged wire touching a grounded metal surface. Locating and repairing this short circuit is critical to prevent further damage.
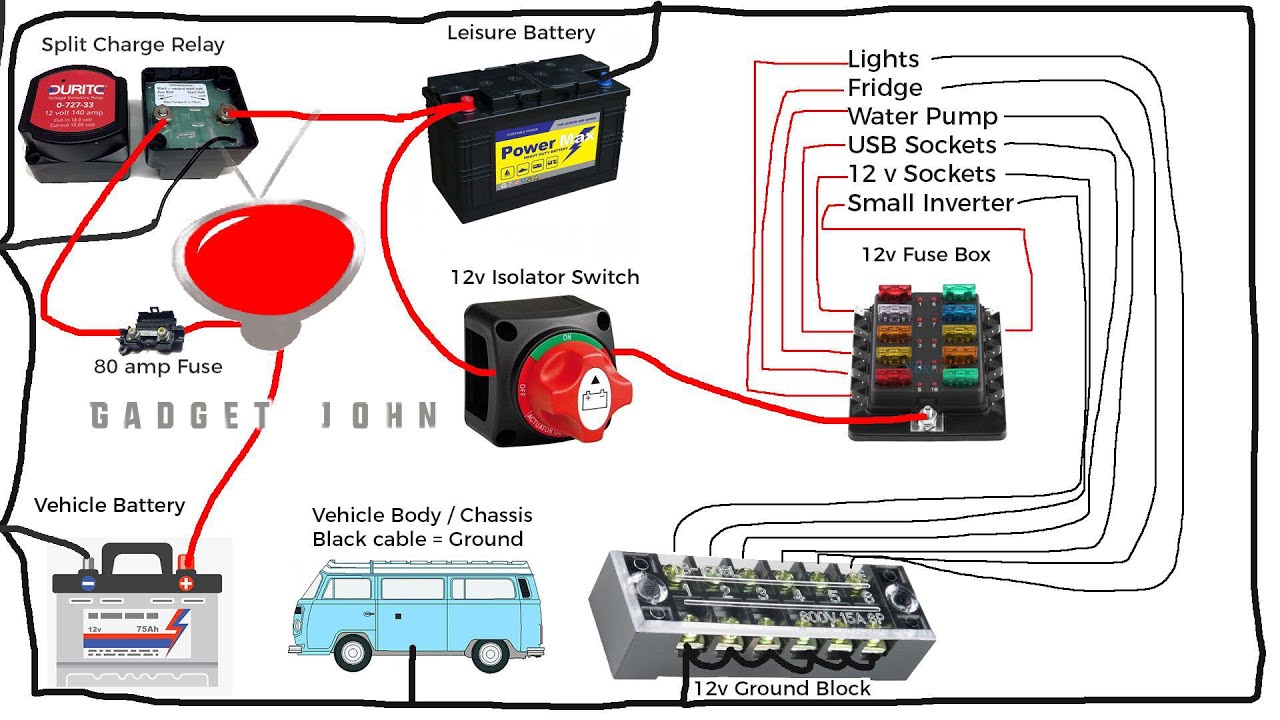
Battery Switch and Power Management Systems
Your travel trailer’s battery switch is a crucial component, but it doesn’t work in isolation. It’s a key player in a larger power management system, coordinating the flow of electricity from various sources to your appliances and batteries. Understanding this interplay is vital for maximizing your off-grid power capabilities and preventing issues. This section will explore how the battery switch interacts with other systems and highlight different power management system setups.The battery switch acts as a central control point, directing power from your house batteries to various circuits in your RV.
However, many modern RVs incorporate additional power sources and management systems, such as solar panels and inverters, which interact directly with the battery bank. The efficiency and effectiveness of your entire power system depend heavily on how these components work together.
Power Management System Components and Their Relationship with the Battery Switch
Understanding the relationship between the battery switch and other power management components is key to preventing problems and maximizing your RV’s power capabilities. A typical system involves several key players.
- Battery Switch: This is the primary control, allowing you to isolate or connect your house batteries to the RV’s electrical system. It’s the gatekeeper for power flowing from your batteries.
- House Batteries: These deep-cycle batteries provide power for your RV’s appliances and lights when you’re not connected to shore power. The battery switch controls their connection to the system.
- Solar Panels: These panels convert sunlight into DC electricity, which is then typically routed through a charge controller before reaching the batteries. The battery switch doesn’t directly control solar input, but the solar charge controller manages the charging process and prevents overcharging.
- Charge Controller: This device regulates the flow of electricity from your solar panels to your batteries, protecting them from overcharging and ensuring optimal charging efficiency. It works independently of the battery switch, but its output affects the battery’s state of charge.
- Inverter: This converts the DC power from your batteries into AC power, allowing you to run household appliances that require alternating current. The battery switch controls the DC power supply to the inverter, essentially acting as an on/off switch for many AC-powered devices.
- Converter/Charger: This device converts AC power from shore power or a generator to DC power to charge your batteries. While not directly controlled by the battery switch, the converter/charger’s operation impacts the battery’s state of charge, which the battery switch then manages.
Comparison of Different Power Management Systems
Several different power management systems exist, each with varying levels of sophistication and integration with the battery switch.A simple system might involve only a battery switch, house batteries, and a converter/charger. More complex systems incorporate solar panels, sophisticated charge controllers with multiple charging algorithms (MPPT, PWM), and possibly an automatic generator start system. High-end systems often feature digital displays showing battery voltage, amperage, and state of charge, and may include remote monitoring capabilities.
The battery switch remains central, but its role changes depending on the complexity of the overall system. For instance, in a system with a solar panel and an automatic generator start, the battery switch might only be used for manually disconnecting the batteries for maintenance. The automatic system would manage charging and power distribution based on the battery state of charge.
Mastering your travel trailer’s battery switch is a vital skill for any RV owner. By understanding the different types, practicing safe handling procedures, and performing regular maintenance, you can prevent costly repairs and ensure a consistently reliable power supply for your adventures. Remember to always prioritize safety when working with batteries and electrical systems. Happy travels!
Quick FAQs
What happens if my battery switch is faulty?
A faulty switch can lead to no power, inconsistent power, or even battery damage. Troubleshooting involves checking fuses, connections, and the switch itself.
How often should I inspect my battery switch and connections?
Ideally, inspect your battery switch and connections every three months, or before each extended trip, checking for corrosion and loose connections.
Can I use any type of battery switch in my travel trailer?
No, the correct switch depends on your trailer’s wiring and battery setup. Choose a switch with the appropriate amperage rating and configuration.
How do I clean corroded battery terminals?
Use a wire brush or terminal cleaner to remove corrosion, then apply a corrosion inhibitor to prevent future buildup.
